
Why?
You might be asking “Why should I use revision control with Splunk – I’m not developing code or anything!” The thing is, with Splunk you are developing code, it’s just that Splunk does a great job of hiding that fact from you! For example, when you add/update a saved search or dashboard, Splunk is adding/updating a text file on the server with that information. This means that we can track those changes and (gasp) document those changes as we make them!
Here are just a few of the advantages to doing things this way:
- Makes it simple to track what you did, when you did it and why you did it.
- Instills some discipline in your Splunk development.
- Gives you the ability (combined with a ticketing system) to associate changes to requests.
- Makes it easier to be experimental via features like branching. Want to see if a revamp somewhere works better? Go ahead – it’s easy to roll back to a known good configuration while retaining all your experiments!
Subversion Setup/Install
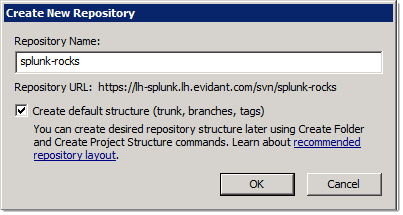
You can skip this section if you already have a working Subversion server. If not, I highly recommend VisualSVN Server (Windows-only, unfortunately) as a dead-simple solution combined with TortoiseSVN as a graphical shell. Once you’ve downloaded it and run setup (the defaults should work just fine for most situations) you’ll want to do two more things – create a repository (stick with the default structure):
… and add at least one user so that you can track the commits.
Splunk Directory Overview
The screenshot below shows the basic Splunk directory structure. As you can see, it’s very “Unix-y”, which actually works in our favor when figuring out what to put in Subversion.
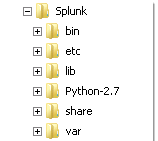
In general (and likely the case for most installations) we will end up only putting items in the “etc” directory into the repository and use ignore properties to keep unneeded/unwanted files out.
Using Subversion with Splunk
Before you start this section you’ll need a repository (new or existing one). The first step is to perform a checkout into the Splunk program directory. This might seem odd, but this is how you add files to a new repository from an existing directory structure. I recommend adding the “etc” directory at the “top” such that the repository will look like this:
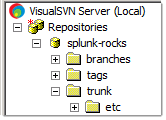
Doing it this way ensures flexibility: while we’re not putting anything in the “var” or “share” directory in the repository now, structuring the repository like I recommend allows us to do so in the future. Below is a screenshot of what the checkout dialog will look like. Be sure that the “Checkout Directory” (in yellow) is the top-level Splunk directory!

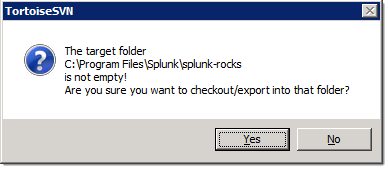
You’ll get this scary looking dialog, but you can ignore it since the repository is empty!
Before we add any files, though, you’ll want to update the global ignore settings for TortoiseSVN. Once you have a fully populated repository you can use svn:ignore properties, but this works best for new repositories. Add the following:
| Ignore Name | Description |
| metadata | These directories are Splunk-generated and change often. Don’t include these because they will cause a lot of “noise” in your repository. |
| history | As the name implies, these directories store history information such as searches you’ve done etc. |
| bin | While these are usually Python files (and thus text), they are system-managed so you probably don’t want them in the repository. |

Now we’re ready to add the actual files and directories to our repository by right-clicking on the “etc” directory and choosing TortoiseSVN->Add. Since we’ve set things up correctly already just choose OK. All the files we want to track will be added. Once you commit we’re ready to actually use revision control to help us manage our Splunk instance!
Some Common Changes
If you have not used revision control with Splunk before you may not have noticed exactly what happens when you make changes in the GUI – this is a nice side benefit. Let’s walk through a few scenarios so you can see what Splunk is doing under-the-covers.
Logging in for the First Time
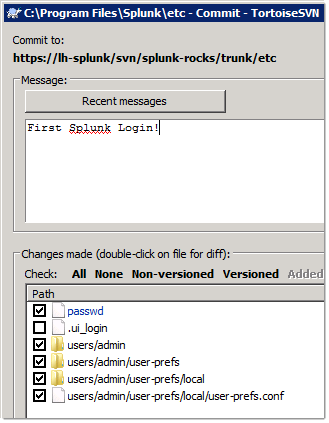
Here’s a screenshot of what changes after you first login with the “admin/changeme” credentials. Notice that Splunk changed a file but also create some directories? This will be a recurring theme.
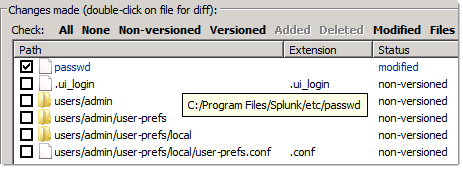
Let’s add the untracked files and commit:
Add a Data Input
Let’s add a directory of SMTP logs and see what changes! Two interesting files were added in this case:
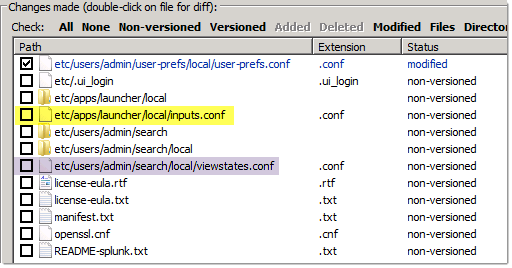
The “inputs.conf” file was added (in yellow) – this is the really important one for us to track! Notice also that “viewstates.conf” was added because I changed the fields I wanted to see.
Be sure to add these directories and commit.
Add a Saved Search
Let’s add a saved search and see what happens…
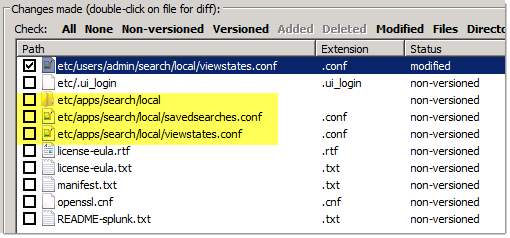
We get an additional directory with two .conf files in the application we created them in – that’s important to keep in mind.
Add a Dashboard
Let’s add a dashboard based on the previous Saved Search. What happens?
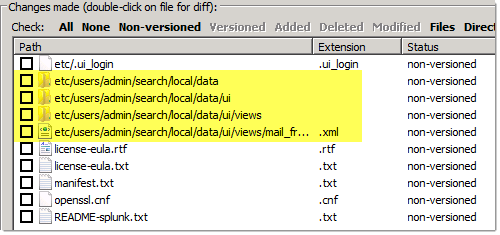
Great! This is actually making sense – but what if I wanted to make this dashboard available to more than just “me” (note the /users/admin/* in the screenshot)? Here’s what happens when I expand the scope to the “Search” application (after a commit – always commit!):
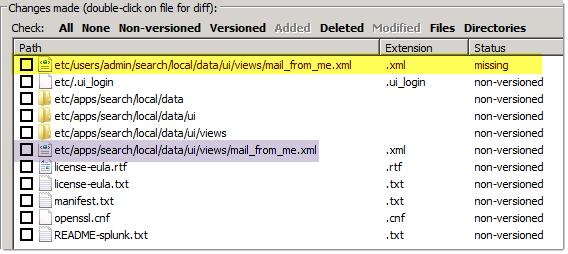
Splunk moved the dashboard definition, which made Subversion note that the previously revision controlled file is now missing (yellow to purple)! There is no way to track this change – so be sure to make good comments!
Workflow Considerations
If all you ever use revision control for is to periodically commit your Splunk configuration changes, that is just dandy. However, the real power of revision control comes when you wrap some “development discipline” around your changes. At a minimum, I suggest the following:
- Use a ticketing system to track all changes, both ones that you make and those that come from “outside”. I highly recommend the free Redmine system (especially the Turnkey Linux version because it also includes all major revision control systems already built-in) – it integrates with Subversion (and most others) so that you can have a full 360-degree view of changes (request->change->commit->document).
- Make changes in discreet functionality “chunks” (as best you can). This allows your commits to be clearer and more trackable by your ticketing system.
- Pay close attention when committing to “new” directories that get created when you add things to Splunk.
- Applications that you download from Splunk will show up in the “apps” directory and – if you use the default settings – will also end up in the repository. This is OK, but something to keep in mind because you will then have two revision control methods – the Splunk Apps store and Subversion.